This is a fantastic request! I’m ready to craft some in-depth, SEO-optimized, and engaging gardening content. Let’s start with your first keyword.
—
How to Plant Thai Basil: Your Guide to Easy, Stunning Success
Ever wondered if you could bring the vibrant, anise-scented magic of Thai basil from your garden to your kitchen? Or perhaps you’ve admired its lush foliage and wondered about the secrets to cultivating a truly thriving plant. Knowing how to plant Thai basil is the first step towards unlocking its culinary potential and enjoying its aromatic beauty in your own backyard. This isn’t just about growing an herb; it’s about cultivating a key ingredient for authentic Southeast Asian dishes, enhancing your garden’s biodiversity, and experiencing the satisfaction of nurturing a unique plant. Get ready to transform your garden into a fragrant paradise with this comprehensive guide.
Quick Answer Box
To successfully plant Thai basil, start with healthy seeds or seedlings in well-draining soil, providing at least 6-8 hours of direct sunlight daily. Water consistently, keeping the soil moist but not waterlogged, and pinch back the tops to encourage bushier growth.
What is Thai Basil and Why It’s Important in Gardening
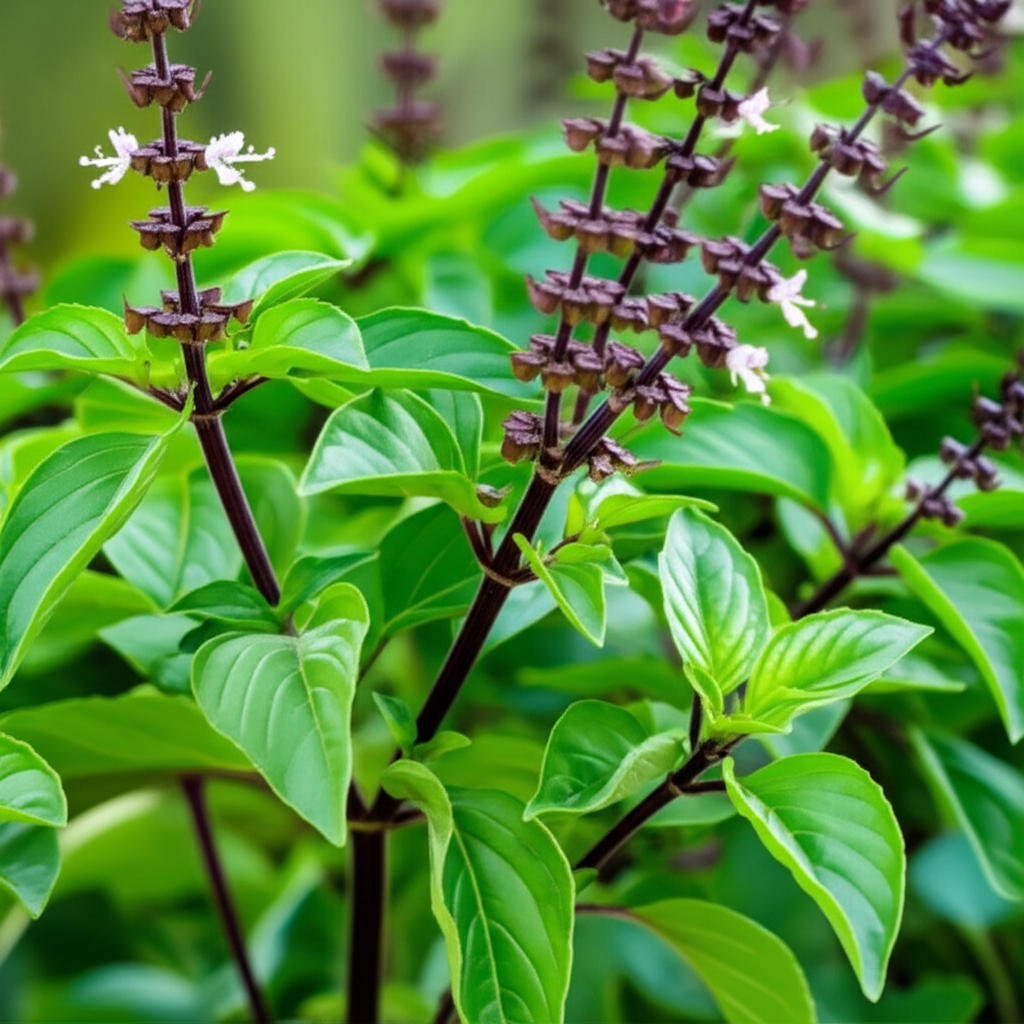
Thai basil (Ocimum basilicum var. thyrsiflora) is a distinctive variety of basil celebrated for its strong anise or licorice-like flavor and aroma, setting it apart from its sweet Italian cousin. Unlike common basil, its leaves are typically narrower and slightly serrated, often with purple stems and a tendency to flower with distinctive purple spikes.
Its importance in gardening stems from several key aspects:
Culinary Significance: Thai basil is an indispensable herb in many Asian cuisines, particularly Thai, Vietnamese, and Cambodian dishes. Its unique flavor profile adds depth and complexity to curries, stir-fries, soups, and fresh spring rolls, making it a highly sought-after ingredient for home cooks and chefs alike.
Aromatic Appeal: The potent fragrance of Thai basil can significantly enhance the sensory experience of a garden, attracting pollinators like bees and butterflies while deterring certain pests with its strong scent.
Ornamental Value: With its attractive purple stems and flower spikes, Thai basil offers a touch of ornamental beauty to herb gardens, vegetable patches, and even container plantings, adding visual interest beyond its culinary uses.
Ease of Cultivation: For many gardeners, Thai basil is surprisingly easy to grow, making it an excellent choice for beginners looking to cultivate flavorful herbs.
Quick Recommendations or Key Insights about Planting Thai Basil
Sunlight is Key: Thai basil thrives in full sun, requiring at least 6-8 hours of direct sunlight per day.
Well-Draining Soil: Use a fertile, well-draining soil mix to prevent root rot.
Warmth Matters: Basil, including Thai basil, is a warm-season herb and dislikes frost. Plant after the last frost date.
Water Wisely: Keep the soil consistently moist but avoid overwatering. Water at the base of the plant.
Pinch for Bushiness: Regularly pinch off the top leaves and flower buds to encourage a fuller, more productive plant.
Harvest Regularly: Frequent harvesting not only provides you with fresh basil but also promotes continued growth.
Detailed Breakdown of How to Plant Thai Basil
Understanding the nuances of planting Thai basil ensures you’re setting your plants up for optimal growth and flavor. This section will delve into the best practices, from seed starting to transplanting, covering the scientific basis and practical applications.
Starting Thai Basil from Seed
Starting Thai basil from seed is a rewarding and cost-effective way to cultivate this herb. The process requires patience and attention to the specific needs of young basil seedlings.
Scientific Perspective: Basil seeds are relatively small and require warmth and moisture to germinate. They contain an embryo and stored food, protected by a seed coat. Germination is epigeal, meaning the cotyledons (seed leaves) emerge above the soil surface. Optimal germination temperatures for basil are between 70-85°F (21-29°C). Too cold, and germination will be slow or fail; too hot, and the seeds can rot.
Practical Applications & Step-by-Step:
1. Timing: Start seeds indoors 4-6 weeks before your last expected frost date. This allows you to get a head start on the growing season, especially in cooler climates.
2. Seed Starting Mix: Use a sterile, lightweight seed-starting mix. Avoid heavy garden soil, which can compact and impede germination.
3. Sowing: Fill seed trays or small pots with the mix. Sow seeds about 1/4 inch deep. You can sow 2-3 seeds per cell or pot, thinning to the strongest seedling later.
4. Moisture: Gently water the soil to ensure it is evenly moist. Using a spray bottle can prevent disturbing the seeds.
5. Warmth: Place the seed tray in a warm location. A heat mat can significantly improve germination rates. Cover the tray with a plastic dome or plastic wrap to maintain humidity, but ensure there are small ventilation holes or remove it for a few hours daily to prevent mold.
6. Light: Once seedlings emerge (typically 5-10 days), they need bright light. A sunny windowsill might suffice, but grow lights are ideal to prevent leggy seedlings. Keep lights 2-4 inches above the seedlings.
7. Watering Seedlings: Keep the soil consistently moist. Water from the bottom by placing the tray in a shallow dish of water; the soil will wick up moisture.
8. Thinning: Once seedlings have their first set of true leaves (the leaves that appear after the initial cotyledons), thin them by snipping the weaker seedlings at the soil line with clean scissors. This prevents disturbing the roots of the remaining seedling.
Transplanting Thai Basil Seedlings
Once your seedlings are robust enough and the danger of frost has passed, it’s time to transplant them into their permanent garden beds or larger containers.
Scientific Perspective: Transplant shock occurs when a plant’s root system is disturbed, leading to a temporary halt in growth as it tries to establish new roots. Basil, with its relatively delicate root system, can be susceptible. Gradual acclimatization (hardening off) helps seedlings adjust to outdoor conditions.
Practical Applications & Step-by-Step:
1. Hardening Off: About a week to 10 days before transplanting, begin hardening off your seedlings. Start by placing them outdoors in a sheltered spot (out of direct sun and strong winds) for a few hours each day. Gradually increase their exposure to sunlight and wind over the week. Bring them in at night if temperatures drop significantly.
2. Soil Preparation: Choose a location that receives at least 6-8 hours of direct sunlight. Amend the garden soil with compost or well-rotted manure to improve fertility and drainage. If planting in containers, use a high-quality potting mix.
3. Spacing: Space Thai basil plants about 12-18 inches apart. This allows for good air circulation, which helps prevent fungal diseases, and gives plants room to grow to their mature size.
4. Transplanting: Dig a hole slightly larger than the seedling’s root ball. Gently remove the seedling from its pot, being careful not to damage the roots. If the roots are tightly bound (root-bound), gently loosen them at the bottom.
5. Planting Depth: Plant the seedling at the same depth it was in its original pot. Some gardeners plant basil slightly deeper, burying the stem up to the first set of leaves, as the buried stem can develop additional roots.
6. Watering After Transplanting: Water the newly transplanted seedlings thoroughly to settle the soil around the roots and reduce transplant shock.
7. Mulching: Apply a layer of mulch (like straw, shredded bark, or compost) around the base of the plants, keeping it a few inches away from the stem. Mulch helps retain soil moisture, suppress weeds, and regulate soil temperature.
Planting Thai Basil from Cuttings
Propagating Thai basil from cuttings is a quick and effective way to get new plants, especially if you already have a healthy plant.
Scientific Perspective: Cuttings are vegetative pieces of a plant that can regenerate into a whole new plant. Basil cuttings readily form adventitious roots, which are roots that arise from non-root tissues, like the stem. This process is a form of asexual reproduction, ensuring the new plant is genetically identical to the parent plant.
Practical Applications & Step-by-Step:
1. Taking Cuttings: Select a healthy, non-flowering stem from a mature Thai basil plant. Using clean, sharp scissors or pruners, cut a stem about 4-6 inches long, just below a leaf node (where leaves attach to the stem).
2. Prepare the Cutting: Remove the leaves from the bottom 2-3 inches of the cutting. This exposes the nodes where roots will form. You can optionally dip the cut end in rooting hormone, though basil often roots well without it.
3. Rooting in Water: Place the prepared cuttings in a glass or jar of clean water. Ensure the leaf nodes are submerged. Place the jar in a bright location, but out of direct, intense sunlight. Change the water every few days to keep it fresh and prevent bacterial growth. Roots should appear within 1-3 weeks.
4. Rooting in Soil: Alternatively, you can plant the prepared cuttings directly into a pot filled with moist seed-starting mix or a light potting soil. Insert the cut end into the soil, ensuring at least one leaf node is buried. You can use a plastic bag or a clear plastic dome to create a humid environment around the cuttings. Keep the soil consistently moist.
5. Transplanting Rooted Cuttings: Once the cuttings have developed a good root system (about 1-2 inches long for water-rooted cuttings, or when they show signs of new growth and resist gently tugging for soil-rooted cuttings), they are ready to be transplanted into their own pots or garden beds, following the transplanting guidelines above.
Practical Applications in the Garden
Integrating Thai basil into your gardening routine is straightforward and highly rewarding.
Herb Garden: Plant Thai basil alongside other popular herbs like mint, cilantro, and oregano. Its distinct flavor and aroma complement many culinary pairings.
Vegetable Garden Companion Planting: Thai basil can act as a beneficial companion plant. Its strong scent is believed to deter some common vegetable pests like aphids and flies. It pairs well with tomatoes, peppers, and eggplants.
Container Gardening: Thai basil is an excellent candidate for container growing. A pot at least 6-8 inches in diameter is suitable for a single plant. Ensure the container has drainage holes. Place containers on a sunny patio, balcony, or windowsill.
Edible Landscaping: Its attractive foliage and purple flower spikes make Thai basil a beautiful addition to mixed borders and flower beds, blurring the lines between ornamental and edible gardening.
Common Mistakes to Avoid
Even experienced gardeners can fall into common traps when planting Thai basil. Being aware of these pitfalls can save you time and ensure a bountiful harvest.
Overwatering: This is the most common mistake. Basil roots need oxygen, and constantly waterlogged soil leads to root rot, yellowing leaves, and eventual plant death. Ensure good drainage.
Underwatering: While basil dislikes soggy soil, it also needs consistent moisture, especially in hot weather. Dry, compacted soil will stress the plant, leading to wilting and stunted growth.
Insufficient Sunlight: Basil is a sun-worshipper. Planting it in a shady spot will result in weak, leggy growth and a less intense flavor. Aim for at least 6-8 hours of direct sun.
Planting Too Early: Basil is sensitive to cold. Planting seedlings or sowing seeds outdoors before the last frost date can kill them or severely stunt their growth.
Ignoring Pinching: If you don’t pinch back the tops and remove flower buds, the plant will focus its energy on flowering and seed production, leading to fewer leaves and a more woody stem.
Poor Soil Drainage: Heavy, compacted soil that retains too much water is a recipe for disaster for basil. Always ensure good aeration and drainage.
Expert Tips or Pro Insights
Seasoned gardeners know that a few extra steps can elevate Thai basil from merely surviving to truly thriving.
Succession Planting: To ensure a continuous supply of fresh Thai basil throughout the growing season, sow seeds or plant seedlings every 3-4 weeks.
Soil Temperature: For direct sowing outdoors, wait until the soil temperature consistently reaches at least 65°F (18°C).
Fertilizing: While basil doesn’t require heavy feeding, a balanced liquid fertilizer diluted to half strength every 4-6 weeks can boost growth, especially in containers where nutrients leach out more quickly. Avoid over-fertilizing with nitrogen, which can lead to lush foliage but reduced flavor intensity.
Pinching Technique: When pinching, cut just above a set of leaves. This encourages two new stems to grow from that leaf node, creating a bushier plant.
Harvesting for Flavor: The best time to harvest is in the morning after the dew has dried but before the heat of the day. This is when the essential oils are most concentrated.
Overwintering (in milder climates): In climates where temperatures rarely drop below freezing, you might be able to overwinter Thai basil plants. Prune them back significantly and protect them from harsh winds and frost. In colder climates, treat them as annuals or bring small potted plants indoors before the first frost.
Seasonal or Climate Considerations
The success of planting Thai basil is heavily influenced by seasonal and climate factors.
Spring: This is the prime time to start seeds indoors or begin planting seedlings outdoors once the danger of frost has completely passed and soil temperatures have warmed.
Summer: Basil thrives in warm weather. Ensure adequate watering during hot, dry spells. Monitor for pests like aphids. Continue pinching to promote growth and prevent premature flowering.
Fall: As temperatures begin to drop, growth will slow. Harvest any remaining basil before the first frost. If you want to save seeds, allow a few plants to flower and go to seed.
Climate Zones:
Warm Climates (Zones 9-11): Thai basil can often be grown year-round. Protect plants from extreme heat and drought during the hottest months, and ensure good air circulation to prevent fungal issues.
Temperate Climates (Zones 6-8): Treat Thai basil as an annual. Start seeds indoors in early spring and transplant outdoors after the last frost. Enjoy the harvest throughout the summer and fall.
Cooler Climates (Zones 4-5): Starting seeds indoors is essential. Transplant seedlings out after the last frost and enjoy the bounty during the short summer season. Consider growing in containers that can be moved to a protected spot or indoors if an unexpected frost threatens.
Buying Guide or Decision-Making Process
When you’re ready to plant Thai basil, you’ll likely encounter seeds or young plants (seedlings or starter plants) at your local nursery or garden center.
Seeds:
Look for: Freshness. Check the seed packet for a harvest or expiry date.
Varieties: While “Thai Basil” is the common name, look for specific cultivars if available, as some may offer slightly different flavor profiles or growth habits.
Source: Purchase from reputable seed companies or garden centers to ensure quality and germination rates.
Young Plants (Seedlings/Starters):
Look for: Healthy, green foliage with no yellowing or wilting. Stems should be firm, not leggy or spindly.
Avoid: Plants that are already flowering heavily (unless you intend to harvest flowers or seeds immediately), as this can indicate the plant is past its prime for leaf production. Also, avoid plants with any signs of pests or diseases.
Container Size: A 3-4 inch pot is usually a good size for a healthy starter plant.
Decision-Making:
For Beginners: Starting with young plants from a nursery can offer a quicker path to harvest and is often more forgiving for those new to gardening.
For the Patient Gardener: Starting from seed is economical and allows you to select from a wider range of varieties. It also provides the satisfaction of nurturing the plant from its very beginning.
For Experimenters: Cuttings are a great way to multiply plants you already have or to try propagating from a friend’s garden.
FAQ Section for How to Plant Thai Basil
Q1: Can I plant Thai basil directly in the garden after the last frost?
A: Yes, but only after all danger of frost has passed and the soil has warmed to at least 65°F (18°C). For best results, especially in cooler climates, starting seeds indoors 4-6 weeks prior to the last frost date is recommended.
Q2: How often should I water Thai basil?
A: Water your Thai basil when the top inch of soil feels dry to the touch. Aim for consistent moisture, but avoid waterlogging the roots. Watering at the base of the plant in the morning is ideal.
Q3: My Thai basil leaves are turning yellow. What could be wrong?
A: Yellowing leaves are often a sign of overwatering and poor drainage, leading to root rot. It can also be a symptom of nutrient deficiency, especially if the plant is in a container and hasn’t been fertilized. Ensure good drainage and adjust your watering schedule. If it persists, consider a diluted liquid fertilizer.
Q4: Can Thai basil grow in partial shade?
A: While Thai basil will tolerate some light shade, it performs best and produces the most flavorful leaves when grown in full sun (6-8 hours of direct sunlight per day). In partial shade, growth may be slower and less bushy.
Q5: When should I start harvesting Thai basil?
A: You can begin harvesting leaves once the plant is about 6 inches tall. For the healthiest growth and to encourage bushiness, start by pinching off the top sets of leaves. Avoid taking more than one-third of the plant at any one time.
Conclusion for How to Plant Thai Basil
Mastering how to plant Thai basil opens up a world of vibrant flavors and aromatic

