
How to Plant Basil Cuttings: Your Easy & Stunning Guide to Endless Flavor
Ever found yourself staring at a lush basil plant, overflowing with fragrant leaves, and wished you could magically multiply it? The good news is, you don’t need a magic wand – just a simple trick that every gardener should know! How to plant basil cuttings is your key to unlocking a continuous supply of this beloved herb, transforming a single plant into a veritable basil bounty. Mastering this technique not only ensures you’ll never run out of fresh basil for your Caprese salads and pesto but also contributes to a more sustainable and resourceful gardening practice. Let’s dive into the simple steps that will have you propagating basil like a pro.
Quick Answer Box
Yes, you can easily propagate basil from cuttings! How to plant basil cuttings involves taking stem sections from a healthy basil plant, removing the lower leaves, and placing them in water or directly into moist soil until roots develop. This method is highly effective and allows you to quickly expand your herb garden or replace older plants.
What is Planting Basil Cuttings and Why It’s Important in Gardening
Planting basil cuttings refers to the horticultural practice of propagating new basil plants from stem sections of an existing, mature basil plant. This is a form of vegetative propagation, meaning the new plant will be genetically identical to the parent plant. Instead of starting from seeds, which can be slower and sometimes less predictable, cuttings allow for rapid multiplication and ensure you get the exact variety of basil you desire.
The importance of knowing how to plant basil cuttings in gardening is multi-faceted. Firstly, it’s an incredibly economical way to increase your herb supply. Instead of buying new plants, you leverage existing ones. Secondly, it’s a fantastic method for reviving leggy or overgrown basil plants, giving them a new lease on life and preventing waste. For those who live in climates with short growing seasons, propagating cuttings indoors during winter can provide a continuous harvest. Finally, it’s a simple yet rewarding technique that fosters a deeper understanding of plant growth and a more sustainable approach to gardening, reducing the need for purchasing new plants and minimizing your garden’s footprint.
Quick Recommendations or Key Insights about Planting Basil Cuttings
Choose Healthy Stems: Select vibrant, non-flowering stems from a healthy, vigorous basil plant.
Cut Below a Node: Make your cut just below a leaf node (where leaves emerge from the stem).
Remove Lower Leaves: Strip off the leaves from the bottom half of the cutting.
Water Propagation is Easiest: Start cuttings in a glass of water, changing it every few days.
Roots Appear in 1-3 Weeks: Watch for small white roots emerging from the nodes.
Transplant When Rooted: Once roots are about an inch long, they’re ready for soil.
Keep Cuttings Moist: Until roots are established, keep the soil consistently damp.
Basil Loves Sunshine: Place cuttings and young plants in a sunny location.
Detailed Breakdown of How to Plant Basil Cuttings
Understanding the “how” behind planting basil cuttings unlocks a world of easy propagation. This process is remarkably straightforward, making it an ideal starting point for novice gardeners and a reliable method for experienced horticulturists.
The Scientific Perspective: Why Cuttings Work for Basil
Basil, like many herbaceous plants, possesses remarkable regenerative capabilities. The magic lies in the nodes – the points on a stem where leaves and buds grow. These nodes are rich in adventitious buds, which are dormant buds capable of developing into roots or shoots when the stem is placed in a suitable environment, such as water or moist soil. When a basil stem is cut and its lower leaves are removed, exposing these nodes to moisture, the plant’s natural hormones (specifically auxins) are triggered. These hormones signal the cells at the nodes to differentiate and begin forming new root structures. The stem also continues to photosynthesize using its upper leaves, providing the energy needed for root development. This biological process is why basil cuttings are so successful and why the new plant is a genetic clone of the parent.
Practical Applications: From One Plant to Many
The practical applications of how to plant basil cuttings are abundant in any garden:
Instant Plant Multiplication: If you have one thriving basil plant, you can easily create several new ones. This is perfect for sharing with friends, filling out garden beds, or having backups.
Reviving Leggy Plants: As basil plants grow, they can become leggy and less bushy. Taking cuttings from the top of these plants encourages the main plant to branch out and become bushier, while the cuttings provide new life.
Overwintering Basil: In colder climates, basil is an annual. You can bring cuttings indoors, root them, and grow them as houseplants throughout the winter, enjoying fresh basil year-round.
Succession Planting: Start new batches of basil from cuttings every few weeks to ensure a continuous harvest throughout the growing season.
Step-by-Step Gardening Instructions: Your Basil Propagation Journey
Follow these simple steps to successfully plant basil cuttings:
1. Select Your Mother Plant: Choose a healthy, vigorous basil plant. Look for stems that are green and sturdy, avoiding any that show signs of flowering, disease, or damage. It’s best to take cuttings in the morning when the plant is well-hydrated.
2. Make the Cut: Using clean, sharp scissors or pruning shears, cut a stem that is about 4-6 inches long. The crucial part is to make the cut just below a leaf node. This is the point where leaves attach to the stem and where new roots are most likely to form.
3. Prepare the Cutting: Gently strip off the leaves from the bottom half of the stem. You want to leave at least two sets of leaves at the top of the cutting. This is important because any leaves submerged in water or soil will rot and can introduce disease. The remaining leaves will be used for photosynthesis.
4. Choose Your Rooting Medium: You have two primary options:
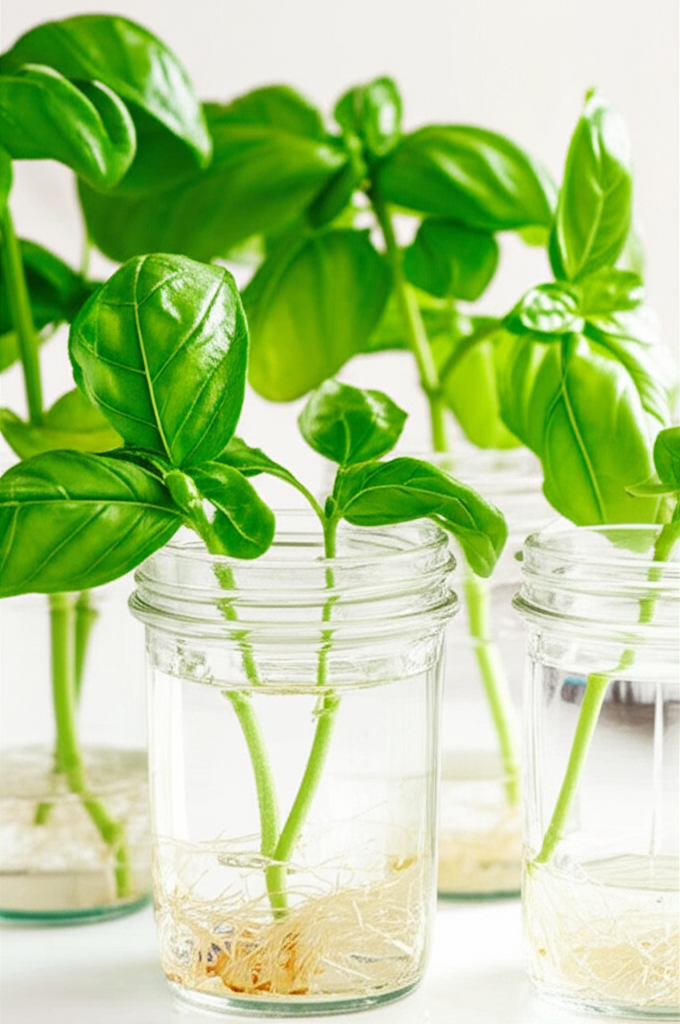
Water Propagation: This is the most popular and visually satisfying method for basil. Place the prepared cuttings in a clean glass or jar filled with fresh water. Ensure that the leaf nodes you removed are submerged, but the remaining leaves are above the water line. Place the glass in a bright location, but out of direct, scorching sunlight.
Soil Propagation: Alternatively, you can plant the cuttings directly into a pot filled with moist, well-draining potting mix. You can dip the cut end in rooting hormone (optional, but can speed up the process) before inserting it into the soil.
5. Maintain the Environment:
For Water Cuttings: Change the water every 2-3 days to keep it fresh and oxygenated, which helps prevent bacterial growth.
For Soil Cuttings: Keep the soil consistently moist but not waterlogged. You can cover the pot with a plastic bag or a humidity dome to maintain a humid environment, which is beneficial for root development. Ensure there’s some airflow to prevent mold.
6. Wait for Roots: Within 1 to 3 weeks, you should start to see small white roots emerging from the submerged nodes. For water cuttings, they will be visible in the glass. For soil cuttings, you might need to gently tug on a cutting to feel resistance, indicating root formation.
7. Transplant to Soil (if water-rooted): Once the roots are about an inch long, your cuttings are ready to be transplanted into pots or your garden. Use a good quality potting mix. Handle the delicate new roots with care. After planting, water thoroughly to help settle the soil around the roots.
8. Continue Care: Keep the newly transplanted basil in a bright spot and ensure the soil remains consistently moist for the first week or two as the roots establish themselves in their new home.
Practical Applications in the Garden
Instant Herb Garden Expansion: Got a small pot of basil? Now you have several! Fill in gaps in your herb garden, start a dedicated basil patch, or pot them up for kitchen windowsill growing.
Gift of Greenery: Share your rooted cuttings with fellow gardeners or friends who appreciate fresh herbs. It’s a thoughtful and sustainable gift.
Succession Planting for Continuous Harvest: Start a new batch of cuttings every 3-4 weeks during the growing season to ensure you always have young, productive basil plants. This prevents a lull in your harvest as older plants naturally decline.
Revitalizing Overgrown Plants: If your basil plant is getting leggy, take cuttings from the top. This not only provides new plants but also encourages the original plant to become bushier and produce more leaves from its lower stem.
Common Mistakes to Avoid
Using Non-Flowering Stems: While you can technically take cuttings from flowering stems, the energy is diverted to flower production, making root development less vigorous. Always aim for vegetative (non-flowering) stems.
Cutting from Unhealthy Plants: Cuttings taken from weak or diseased plants are unlikely to thrive. Start with your healthiest specimens.
Submerging Too Many Leaves: Leaves below the water or soil line will rot, potentially killing the cutting or introducing fungal diseases. Always remove lower leaves.
Overcrowding Cuttings: In water, give cuttings a little space so they don’t touch excessively, reducing the risk of rot. In soil, ensure they have room to develop roots without competing too much.
Letting Soil Dry Out: For soil-propagated cuttings, consistently moist soil is crucial. Allowing it to dry out can kill the developing roots.
Exposing Water Cuttings to Direct Sun: While basil loves sun, direct sunlight on a glass of water can overheat the water, stress the cuttings, and encourage algae growth. Bright, indirect light is best.
Transplanting Too Early: Wait until the roots are a decent size (around an inch) before moving them from water to soil. Roots that are too short can be easily damaged and may struggle to establish.
Expert Tips or Pro Insights
The “Pinch and Propagate” Method: When your basil plant is growing vigorously, pinch off the top few inches of a stem. Instead of discarding it, use it as a cutting! This practice of pinching encourages branching and simultaneously provides you with a cutting to propagate.
Rooting Hormone is Optional but Helpful: While basil roots readily in water, using a rooting hormone powder or gel on the cut end before planting in soil can significantly speed up root formation and increase the success rate, especially for more experienced propagators.
Use Filtered or Distilled Water Initially: For water propagation, some growers find that using filtered or distilled water for the first few days can be beneficial, as tap water can sometimes contain chlorine or fluoride that might inhibit initial root formation, though most basil is quite forgiving.
Monitor for Rot: Even with careful preparation, sometimes a cutting can start to rot. If you see any slimy or blackening tissue, remove that cutting immediately to prevent it from affecting others.
Consider Different Basil Varieties: Some basil varieties might root slightly faster or slower than others, but the fundamental process remains the same for all common types like Sweet Basil, Genovese, Thai, and Purple Basil.
Acclimate Water-Rooted Cuttings: When moving water-rooted cuttings to soil, it’s good practice to acclimate them gradually. If the environment is significantly different (e.g., moving from high humidity in a bag to open air), you might cover them loosely with a plastic bag for a day or two to reduce transplant shock.
Seasonal or Climate Considerations
The beauty of how to plant basil cuttings is that it can be adapted to various seasons and climates.
Spring/Summer: This is the prime time for basil propagation outdoors. You can take cuttings from your established plants and plant them directly into pots or garden beds, and they will root and grow quickly in warm weather and ample sunlight.
Fall: As temperatures begin to drop and the first frost threatens, this is the ideal time to take cuttings if you want to overwinter basil indoors. Propagate them inside your home and keep them on a sunny windowsill.
Winter: Propagation can still occur indoors under grow lights or on a very sunny windowsill. The growth rate may be slower due to lower light levels and potentially drier indoor air, so maintaining consistent moisture and humidity is key.
Climate Zones: In frost-free climates, basil can be propagated and grown year-round. In colder zones, the techniques described for overwintering indoors become essential for continuous enjoyment of fresh basil.
Buying Guide or Decision-Making Process
While planting basil cuttings is about propagation, if you’re starting and need a mother plant or pots for your new cuttings, consider these:
Mother Plant: If you don’t have a basil plant yet, purchase a healthy, well-established plant from a reputable nursery or garden center. Look for lush, green foliage and no signs of pests or disease. Alternatively, start from seeds indoors 6-8 weeks before your last frost date.
Pots: For water propagation, clear glasses or jars are ideal so you can easily monitor root growth. For soil propagation, choose small pots (4-6 inches) with drainage holes. Terracotta pots are excellent for soil cuttings as they allow for better aeration and prevent overwatering, but plastic pots are also fine.
Potting Mix: Use a high-quality, sterile seed-starting mix or a light, well-draining potting mix. Avoid heavy garden soil, which can compact and hinder root development.
* Rooting Hormone (Optional): Available at most garden centers, rooting hormone can be a worthwhile purchase for an extra boost, especially if you’re new to propagation.
FAQ Section for How to Plant Basil Cuttings
Q1: How long does it take for basil cuttings to root?
A1: Basil cuttings typically start to root within 1 to 3 weeks when placed in water or moist soil. You’ll see visible roots, usually white and fleshy, emerging from the nodes.
Q2: Can I plant basil cuttings directly into the garden soil?
A2: Yes, you can plant basil cuttings directly into well-draining, moist soil. Ensure you choose healthy stems, prepare them by removing lower leaves, and keep the soil consistently damp until roots are established.
Q3: What’s the best time of year to take basil cuttings?
A3: The best time is during the active growing season, typically spring and summer, when plants are healthy and vigorous. Fall is also a good time to take cuttings to bring indoors for overwintering.
Q4: My basil cuttings are rotting in water. What am I doing wrong?
A4: Rotting usually occurs due to submerged leaves decaying or stagnant water. Ensure you remove all leaves that would be below the waterline, change the water every 2-3 days, and don’t overcrowd the container.
Q5: How do I know when my water-rooted basil cuttings are ready to be planted in soil?
A5: Your cuttings are ready when the roots have grown to about 1-2 inches in length. They should look healthy and white, not brown or mushy.
Q6: Can I propagate basil from a flowering stem?
A6: It’s best to avoid flowering stems if possible, as the plant’s energy is directed towards producing flowers and seeds, which can slow down root development. Choose non-flowering, vegetative stems for the best results.
Q7: How should I care for basil cuttings after transplanting them into soil?
A7: After transplanting, keep the soil consistently moist for the first week or two to help the roots establish. Provide bright, indirect light, and gradually introduce them to more direct sunlight as they grow stronger.
Conclusion for How to Plant Basil Cuttings
Mastering how to plant basil cuttings is a simple yet incredibly rewarding gardening skill that grants you an endless supply of fragrant, delicious basil. By following these straightforward steps, from selecting the right stems to providing the optimal conditions for root development, you can effortlessly multiply your basil plants, share them with loved ones, and enjoy fresh harvests throughout the season and even into winter. Embrace this easy propagation method to enhance your herb garden, reduce waste, and cultivate a deeper connection with your plants. Start propagating today and unlock the full potential of your basil plants.

