
How to Plant Basil Cuttings: Your Guide to Easy & Stunning Growth
Have you ever marveled at a lush basil plant, bursting with fragrant leaves, and wished you could replicate that abundance in your own garden? The secret to achieving this botanical bounty often lies in a simple yet incredibly effective propagation method: planting basil cuttings. Mastering this technique is your key to expanding your herb garden, sharing the love of fresh basil with friends, and ensuring a continuous supply of this culinary staple throughout the growing season. Understanding how to plant basil cuttings not only promotes plant health by allowing for rapid multiplication but also enhances garden productivity and offers a sustainable way to grow your favorite herbs.
Quick Answer Box
You can easily plant basil cuttings by taking a healthy stem, removing the lower leaves, and placing the cut end in water until roots develop, or directly into moist soil. This method is a fast and efficient way to propagate basil, allowing you to create new plants from existing ones with minimal effort.
What is Planting Basil Cuttings and Why It’s Important in Gardening
Planting basil cuttings, also known as stem cuttings or vegetative propagation, is a horticultural technique where a piece of stem from a healthy parent basil plant is used to grow a new, genetically identical plant. This process bypasses the need for seeds and is a far quicker way to establish new basil plants.
Why is this important? For gardeners, it means:
Rapid Expansion: You can quickly multiply your basil plants, ensuring a plentiful harvest for cooking, pesto, and more.
Cost-Effective: Instead of buying new plants, you can grow them for free from existing ones.
Preserving Desired Traits: If you have a particularly flavorful or disease-resistant basil variety, cuttings ensure you maintain those specific characteristics.
Revitalizing Older Plants: As basil plants mature and may start to bolt (go to seed), taking cuttings from healthy young shoots can rejuvenate your supply.
Sustainability: It’s an eco-friendly way to garden, reducing waste and reliance on commercially produced plants.
Quick Recommendations or Key Insights about Planting Basil Cuttings
Best Time: Take cuttings in the morning when plants are most hydrated.
Healthy Parent: Always select healthy, vigorous stems from disease-free basil plants.
Water Propagation: Roots will typically form in water within 1-3 weeks.
Soil Propagation: For direct planting, use a well-draining potting mix.
Root Hormone: While not strictly necessary for basil, rooting hormone can speed up the process.
Light: Cuttings need bright, indirect light to root.
Patience: Give your cuttings time to establish; don’t rush to transplant.
Detailed Breakdown of How to Plant Basil Cuttings
The process of planting basil cuttings is remarkably straightforward, making it an ideal project for gardeners of all skill levels. We’ll explore the two primary methods: water propagation and direct soil propagation.
Method 1: Water Propagation
This is arguably the most popular and visually satisfying method for rooting basil cuttings. You can literally watch the roots grow!
Step-by-Step Guide:
1. Select Your Cutting: Choose a healthy, non-flowering stem from your parent basil plant. Look for a stem that is at least 4-6 inches long and has plenty of leaves. Ideally, choose a stem that has a “node” – a small bump or joint on the stem where leaves grow from. This is where roots will emerge.
2. Make the Cut: Using clean, sharp scissors or pruning shears, make a clean cut just below a leaf node. This ensures you’re taking a cutting from a vigorous part of the plant.
3. Prepare the Cutting: Gently remove the leaves from the lower half of the stem, leaving only the top 2-3 sets of leaves. This prevents the submerged leaves from rotting in the water.
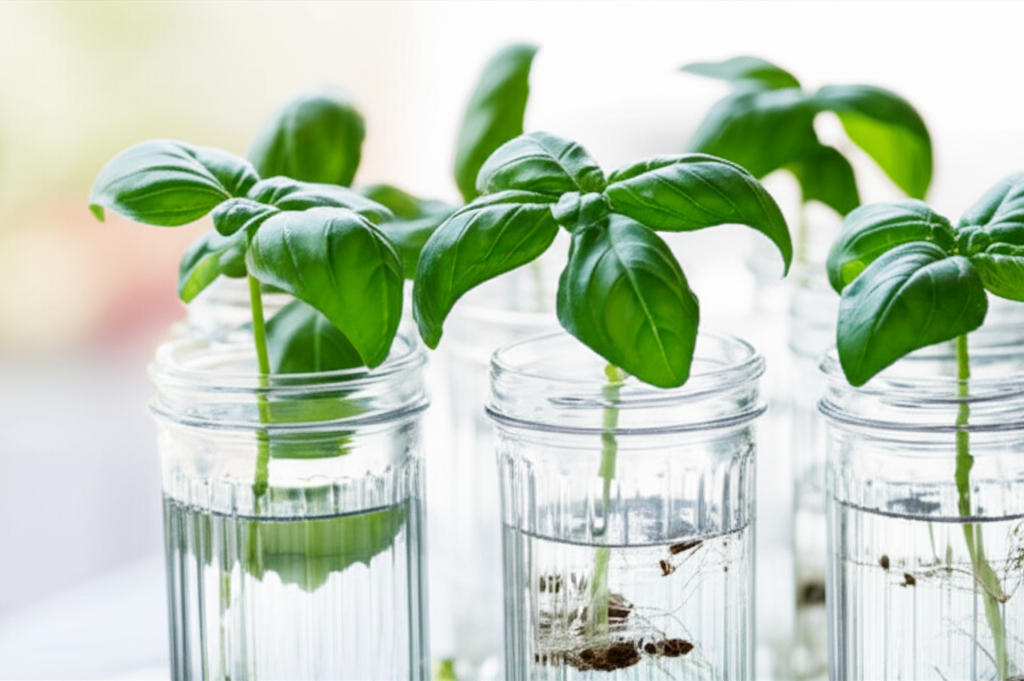
4. Place in Water: Fill a clean jar or glass with fresh, room-temperature water. Place your basil cutting into the water, ensuring that the nodes where you removed the leaves are submerged.
5. Provide Ideal Conditions:
Light: Place the jar in a location that receives bright, indirect sunlight. A windowsill that gets morning sun but is shielded from harsh afternoon rays is perfect.
Water Quality: Change the water every 2-3 days to prevent bacterial growth and keep it fresh.
Temperature: Maintain a consistent, warm room temperature.
6. Watch for Roots: You should start to see small white roots emerging from the submerged nodes within one to two weeks. Basil is a quick rooter, so you might be surprised by how fast it happens!
7. Transplanting: Once the roots are at least 1-2 inches long and have started to branch out, your basil cuttings are ready to be transplanted into soil.
Method 2: Direct Soil Propagation
This method skips the water stage and places the cutting directly into a rooting medium. It can sometimes lead to less transplant shock as the roots develop directly in their permanent home.
Step-by-Step Guide:
1. Select and Cut: Follow steps 1 and 2 from the water propagation method: choose a healthy 4-6 inch stem and cut just below a leaf node.
2. Prepare the Cutting: Remove the lower leaves, leaving only the top 2-3 sets.
3. Optional: Rooting Hormone: You can dip the cut end of the stem into a rooting hormone powder or gel. This isn’t essential for basil, as it roots readily, but it can encourage faster and stronger root development. Tap off any excess hormone.
4. Prepare the Potting Mix: Use a sterile, well-draining potting mix. You can use small pots, seed trays, or even directly in a garden bed if the soil is well-prepared. Moisten the potting mix thoroughly, but ensure it’s not waterlogged.
5. Plant the Cutting: Make a small hole in the potting mix with your finger or a pencil. Insert the prepared basil cutting into the hole, ensuring the node where you removed leaves is buried in the soil. Gently firm the soil around the stem.
6. Provide Ideal Conditions:
Light: Place the pot in a location with bright, indirect sunlight.
Humidity: To maintain humidity, you can cover the pot loosely with a clear plastic bag or a propagation dome. Ensure there’s some ventilation to prevent mold.
Watering: Keep the soil consistently moist but not soggy. Water when the top inch of soil feels dry.
7. Check for Roots: After 2-3 weeks, gently tug on the cutting. If you feel resistance, it means roots have formed. You can also look for new leaf growth, which is a good indicator of successful rooting.
Practical Applications in the Garden
The ability to plant basil cuttings opens up a world of possibilities for your garden:
Continuous Harvest: As soon as one plant starts to slow down or bolt, you can have new, vigorous plants ready to take over, ensuring a steady supply of fresh basil from spring through fall.
Container Gardening: Basil cuttings are perfect for filling pots and window boxes. Propagate cuttings from your best plants to create a dense, lush display.
Sharing with Friends: Basil cuttings are the perfect, thoughtful gift for fellow gardeners or anyone who loves fresh herbs.
Succession Planting: Start a new batch of cuttings every few weeks to guarantee a continuous harvest without gaps.
Companion Planting: Once rooted, these new basil plants can be strategically placed near tomatoes, peppers, and other vegetables to deter pests and enhance growth.
Common Mistakes to Avoid
Using Non-Healthy Stems: Taking cuttings from weak, damaged, or flowering stems will likely result in failure. Always start with vibrant, healthy material.
Not Removing Lower Leaves: Submerged leaves will rot in water or soil, introducing bacteria and fungus that can kill the cutting.
Overcrowding Cuttings: In water propagation, ensure cuttings aren’t touching each other excessively, which can promote rot. In soil, give them a little space.
Direct Sun Exposure: Young cuttings are sensitive to intense sunlight and can scorch. Always opt for bright, indirect light.
Waterlogged Soil: While basil likes moisture, overly saturated soil can lead to root rot, even for cuttings. Ensure good drainage.
Forgetting to Change Water: Stagnant water is a breeding ground for bacteria. Regular changes are crucial for water propagation.
Transplanting Too Soon or Too Late: Wait until the roots are substantial (1-2 inches) before moving to soil. Transplanting too early means the cutting may not have enough roots to support itself.
Expert Tips or Pro Insights
Cleanliness is Key: Always use sterilized cutting tools and clean containers. This minimizes the risk of introducing diseases to your cuttings.
The “Pinch and Propagate” Method: When your basil plant gets bushy, pinch off the top few inches to encourage branching. You can then use these pinched-off stems as cuttings! It’s a two-in-one technique.
Consider a “Mini-Greenhouse”: For soil propagation, placing a clear plastic bag over the pot, secured with a rubber band, creates a humid environment that greatly benefits cuttings. Poke a few small holes for ventilation.
Warmth Accelerates Rooting: Basil roots fastest in warm conditions. If you’re propagating in cooler months, a heat mat can significantly speed up the process.
Rooting Hormone Benefits: While basil roots easily, using a rooting hormone can increase your success rate, especially if you’re a beginner or propagating during less-than-ideal conditions.
Don’t Fertilize Too Soon: Wait until your cuttings have established a good root system and are showing new growth before applying any fertilizer.
Seasonal or Climate Considerations
Spring: This is the ideal time to start basil cuttings, as the plant is entering its active growth phase and the days are getting longer and warmer.
Summer: You can continue propagating throughout the summer. Just be mindful of heat stress on young cuttings and ensure they have adequate shade and consistent moisture.
Fall: As temperatures begin to drop and basil plants start to go to seed, taking cuttings is a great way to preserve your favorite varieties before the first frost. You can then bring rooted cuttings indoors to grow as houseplants.
Indoor Propagation: Basil can be propagated indoors year-round, provided you have sufficient light (a grow light is often necessary during winter months) and warmth.
Buying Guide or Decision-Making Process
While this guide focuses on growing basil from cuttings, if you’re starting with a parent plant, here’s a quick guide to selecting a healthy one:
Leaf Appearance: Look for vibrant, green leaves without yellowing, brown spots, or wilting.
Stem Strength: The stems should be firm and upright, not leggy or weak.
Absence of Pests: Inspect the leaves and stems for any signs of aphids, spider mites, or other common garden pests.
Flowering: While you can take cuttings from flowering plants, it’s best to choose non-flowering stems for propagation as they are more focused on vegetative growth. If the plant is already flowering, pinch off the flower buds before taking cuttings.
* Variety: Consider the type of basil you want. Sweet basil, Genovese basil, Thai basil, lemon basil – each offers a unique flavor and aroma.
FAQ Section for How to Plant Basil Cuttings
Q1: How long does it take for basil cuttings to root?
A1: Basil cuttings typically start to root within 1-3 weeks when placed in water or moist soil under ideal conditions.
Q2: Can I plant basil cuttings directly into the garden?
A2: Yes, you can plant basil cuttings directly into well-prepared, moist soil. Ensure the soil has good drainage and the location receives bright, indirect light.
Q3: What kind of water should I use for water propagation?
A3: Room-temperature, filtered or tap water is perfectly fine. Avoid using very cold or very hot water.
Q4: My basil cuttings are wilting. What could be wrong?
A4: Wilting can occur if the cutting is not getting enough water, if it’s exposed to too much direct sunlight, or if the parent plant was unhealthy. Ensure consistent moisture and bright, indirect light.
Q5: When can I transplant rooted basil cuttings into a larger pot or garden bed?
A5: Transplant your rooted cuttings when the roots are at least 1-2 inches long and have begun to branch out. This usually happens after 2-4 weeks of propagation.
Q6: Do I need to use rooting hormone for basil cuttings?
A6: While basil is very easy to root and will often do well without it, using a rooting hormone can speed up the process and lead to a stronger root system.
Q7: Can I propagate basil from a flowering stem?
A7: It’s best to avoid taking cuttings from stems that are actively flowering. Look for healthy, leafy vegetative growth. If a stem has flower buds, pinch them off before taking the cutting.
Conclusion
Mastering how to plant basil cuttings is a rewarding gardening skill that opens the door to an abundance of fresh, fragrant basil. By following these simple steps, you can effortlessly propagate new plants, ensuring a continuous harvest for your kitchen and a fuller, more vibrant garden. Whether you choose the visual satisfaction of water propagation or the direct approach of soil planting, the outcome is the same: more basil for you, fewer trips to the store, and a deeper connection with your plants. So, grab your shears, find a healthy basil plant, and start propagating – your culinary adventures await.

