
Creating Herbal Products with Candle Bush: Effortless Herbal Creations
Can you imagine transforming your garden into a fragrant apothecary, crafting natural remedies and delightful products right from your own plants? If the idea of harnessing the power of herbs for your well-being and creativity sparks your interest, then you’re in the right place. Many gardeners dream of extending the benefits of their green spaces beyond aesthetics, seeking to utilize their harvests in practical and enriching ways. Understanding how to effectively use herbs like the versatile Candle Bush can unlock a world of effortless herbal creations, contributing to a more sustainable and self-sufficient lifestyle while promoting personal wellness.
Quick Answer Box
Yes, you can absolutely create a variety of herbal products with Candle Bush. Its leaves and flowers can be used to make infusions, poultices, salves, and even natural dyes. These creations offer a wonderful way to harness the plant’s traditional medicinal properties and vibrant color for personal use and gifting.
What is Candle Bush and Why It’s Important in Gardening
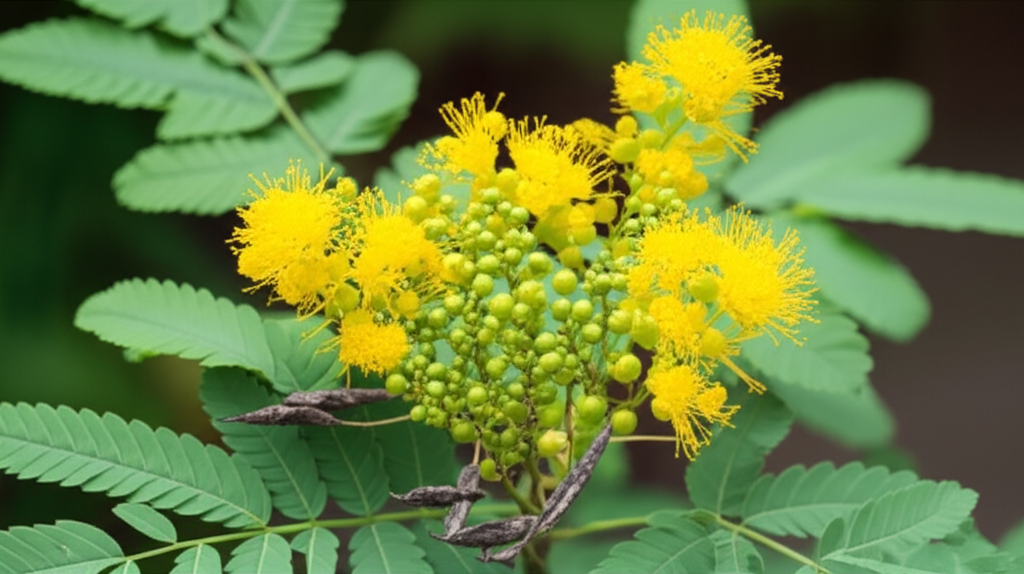
Candle Bush, scientifically known as Senna alata (though often referred to by its common name, or sometimes as Ringworm Shrub or Christmas Candle), is a vibrant flowering shrub native to tropical regions. It’s characterized by its striking, upright racemes of bright yellow flowers that resemble flickering candles, hence its evocative name. Beyond its ornamental appeal, the Candle Bush holds significant importance in traditional herbal medicine and sustainable gardening practices.
Historically, and still today in many cultures, the leaves and flowers of the Candle Bush have been prized for their medicinal properties. They are widely recognized for their antifungal, antibacterial, and laxative qualities, making them a staple in natural health remedies, particularly for skin conditions like ringworm (from which it derives another common name) and for digestive support.
In a gardening context, Candle Bush is valued for its:
Medicinal Potential: Providing a readily available source for natural health remedies.
Ornamental Beauty: Adding a burst of tropical color and visual interest to landscapes.
Ecological Benefits: Attracting pollinators like bees and butterflies, contributing to biodiversity.
Ease of Cultivation: Generally a robust and forgiving plant, making it accessible for many gardeners.
By learning to create herbal products from Candle Bush, gardeners can deepen their connection with their plants, reduce reliance on commercially produced items, and embrace a more natural approach to wellness and household needs.
Quick Recommendations or Key Insights about Candle Bush Herbal Creations
Harvesting: Collect leaves in the morning after dew has dried, and flowers when they are fully open for maximum potency.
Drying: Air-dry leaves and flowers in a well-ventilated, dark area until brittle.
Infusions: Steep fresh or dried leaves in hot water for teas or topical washes.
Poultices: Mash fresh leaves with a little water to create a paste for topical application.
Oils & Salves: Infuse dried leaves in carrier oils, then combine with beeswax for healing salves.
Natural Dyes: Use flowers and leaves to create vibrant yellow and green dyes for fabrics.
Caution: While beneficial, use Candle Bush internally with caution and consult with a healthcare professional, especially if you have pre-existing conditions or are pregnant.
Detailed Breakdown of Creating Herbal Products with Candle Bush
The journey from a flourishing Candle Bush in your garden to a finished herbal product is both rewarding and surprisingly accessible. Let’s delve into the various ways you can harness the power of this remarkable plant.
1. Understanding the Plant’s Properties and Harvest
Before you begin creating, it’s crucial to understand which parts of the Candle Bush are used and how to harvest them for optimal results.
Medicinal Compounds: Candle Bush contains anthraquinones, particularly chrysophanic acid and emodin, which are responsible for its laxative and antifungal properties. Flavonoids and tannins also contribute to its medicinal profile, offering anti-inflammatory and antioxidant benefits.
Harvesting Best Practices:
Leaves: The most commonly used part for medicinal purposes. Harvest mature, healthy leaves from the middle of the plant. It’s best to do this in the morning after the dew has evaporated but before the midday sun becomes too intense. This ensures the plant is hydrated and the active compounds are at their peak. Avoid harvesting leaves that show signs of disease or pest infestation.
Flowers: While less commonly used medicinally than the leaves, the vibrant yellow flowers can be used for natural dyes and in some infusions. Harvest them when they are fully open and vibrant.
Seeds: The seed pods can be used for propagation and are also sometimes used in traditional medicine, though less frequently than leaves.
Sustainable Harvesting: Never take more than a third of the plant at any one time to ensure its continued health and vigor. Rotate your harvesting locations on the plant to allow for regrowth.
2. Drying and Storing Your Harvest
Proper drying and storage are paramount to preserving the potency of your Candle Bush for later use.
Air Drying: This is the most common and recommended method for Candle Bush leaves and flowers.
1. Preparation: Gently rinse harvested plant material if it appears dirty, then pat it dry thoroughly with clean towels.
2. Arrangement: Spread the leaves and flowers in a single layer on drying screens, clean cloths, or parchment paper. Ensure good air circulation around them.
3. Location: Place the screens in a warm, dry, dark, and well-ventilated area. A spare room, attic, or a dehydrator set to a low temperature (around 95-115°F or 35-46°C) are ideal. Direct sunlight can degrade the active compounds and fade the color, especially in the flowers.
4. Monitoring: Turn the plant material occasionally to ensure even drying.
5. Readiness: The leaves and flowers are sufficiently dried when they are brittle and crumble easily when crushed. This can take anywhere from a few days to a couple of weeks, depending on humidity and temperature.
Storage:
Once completely dry, store your Candle Bush in airtight glass jars or containers.
Label each container clearly with the name of the herb, the part used (leaves/flowers), and the date of harvest/drying.
Store the jars in a cool, dark, and dry place, such as a pantry or cupboard. Properly dried and stored herbs can retain their potency for up to a year, though their strength may gradually diminish over time.
3. Creating Herbal Infusions (Teas and Washes)
Infusions are one of the simplest and most popular ways to extract the beneficial properties of herbs.
Herbal Teas (Internal Use):
Laxative Tea: Steep 1-2 teaspoons of dried Candle Bush leaves (or a small handful of fresh leaves) in a cup of hot, not boiling, water for 5-10 minutes. Strain and drink. Note: It’s advisable to start with a small amount to gauge your body’s reaction, and this should be used for occasional relief only.
For Digestive Support: A milder infusion can be made with fewer leaves for general digestive comfort.
Topical Washes/Compresses (External Use):
Antifungal Wash: Steep a generous handful of dried Candle Bush leaves in 2 cups of hot water for 15-20 minutes. Allow it to cool completely. Strain the liquid and use it as a wash or soak for affected skin areas (e.g., for ringworm or fungal infections). You can also soak a clean cloth in the cooled infusion and apply it as a compress.
Soothing Eye Wash (with extreme caution): In some traditional practices, a very dilute, cooled, and carefully strained infusion of Candle Bush leaves has been used for eye irritations. However, due to the potential for irritation, extreme caution is advised, and it is generally safer to avoid using it for eye applications unless under the guidance of a qualified herbalist. Always perform a patch test first.
4. Crafting Poultices and Pastes
Poultices are a direct way to apply the plant’s healing properties to the skin.
Antifungal Poultice:
1. Take a small handful of fresh Candle Bush leaves.
2. Wash them thoroughly and finely chop or mash them using a mortar and pestle, adding a tiny amount of water if needed to form a paste.
3. Apply the fresh paste directly to the affected skin area (e.g., fungal infections, minor rashes).
4. Cover the poultice with a clean cloth or bandage to keep it in place.
5. Leave it on for 15-30 minutes. Rinse the area gently with clean water afterward.
Note: It’s essential to use fresh leaves for poultices for maximum efficacy and to ensure they are clean. Perform a patch test on a small area of unaffected skin first to check for any adverse reactions.
5. Preparing Herbal Oils and Salves
Infusing Candle Bush into oils allows for a longer shelf life and a concentrated form of its beneficial compounds, which can then be turned into healing salves.
Infusing Candle Bush in Oil:
1. Choose Your Oil: Carrier oils like olive oil, almond oil, jojoba oil, or coconut oil work well.
2. Herb to Oil Ratio: Use roughly 1 part dried Candle Bush leaves to 4-5 parts carrier oil by volume. Ensure the leaves are completely submerged in the oil.
3. Methods:
Solar Infusion (Slow Method): Place the dried leaves and oil in a clean glass jar. Seal the jar tightly and place it in a sunny windowsill for 4-6 weeks. Shake the jar gently every day or two.
Gentle Heat Infusion (Faster Method): Place the dried leaves and oil in a heat-safe glass jar or double boiler. Gently heat the mixture over very low heat (e.g., in a crockpot on the “warm” setting, or in a double boiler on the stovetop) for 2-4 hours. Do not overheat or boil the oil, as this can degrade the beneficial compounds. Maintain a temperature that is warm to the touch but not hot.
4. Straining: Once infused, strain the oil through a fine-mesh sieve or cheesecloth. Squeeze out as much oil as possible from the plant material.
5. Storage: Store the infused oil in a clean, airtight glass bottle in a cool, dark place. It should last for several months to a year.
Making Candle Bush Salve:
1. Melt Beeswax: For every 1 cup of infused Candle Bush oil, you’ll need approximately 1 ounce (by weight) of beeswax pellets or grated beeswax. Gently melt the beeswax into the infused oil using a double boiler or microwave in short intervals.
2. Test Consistency: Dip a spoon into the mixture and place it in the refrigerator for a minute. Once cooled, check the consistency. If it’s too soft, add more beeswax; if it’s too hard, add a little more oil.
3. Add Essential Oils (Optional): Once the mixture is melted and the consistency is right, you can add a few drops of complementary essential oils like tea tree oil (for antifungal properties) or lavender oil (for soothing). Stir well.
4. Pour and Cool: Carefully pour the warm liquid into clean salve tins or small glass jars. Let them cool completely and solidify without disturbing them.
5. Label: Once solidified, label your salves with the ingredients and date. These salves are excellent for treating minor skin irritations, fungal infections, and dryness.
6. Utilizing Candle Bush for Natural Dyes
The vibrant yellow flowers of the Candle Bush are a fantastic source for natural fabric dyes, producing beautiful shades of yellow and gold.
Preparing the Dye Bath:
1. Gather Flowers: Collect a generous amount of fresh Candle Bush flowers.
2. Simmer: Place the flowers in a pot (use a pot dedicated to dyeing or one you don’t mind staining) and cover them with water.
3. Heat: Bring the water to a gentle simmer and let it cook for about an hour, or until the water has taken on a rich yellow or orange hue.
4. Strain: Strain the liquid to remove the plant material, leaving you with a vibrant dye bath.
Dyeing Fabrics:
1. Mordanting: For the color to be more permanent and vibrant, it’s recommended to mordant your fabric (natural fibers like cotton, linen, wool, silk work best). Alum is a common and safe mordant for home use. Follow mordanting instructions specific to your chosen mordant and fabric type.
2. Dyeing Process: Immerse your pre-wetted, mordanted fabric into the warm dye bath.
3. Simmer: Gently simmer the fabric in the dye bath for at least an hour, stirring occasionally to ensure even color distribution. For deeper shades, you can leave the fabric to soak in the dye bath overnight as it cools.
4. Rinsing: Carefully remove the fabric from the dye bath and rinse it thoroughly in cool water until the water runs clear.
5. Drying: Hang the dyed fabric to dry away from direct sunlight.
Color Variations: The shade of yellow you achieve can vary depending on the age of the flowers, the water pH, and the mordant used. You can also experiment with adding other natural materials to create different hues.
7. Candle Bush in Potpourri and Sachets
The lovely fragrance of the dried leaves and flowers can also be used to add a natural scent to your home.
Preparation: Ensure your harvested leaves and flowers are completely dry and brittle.
Potpourri: Combine dried Candle Bush leaves and flowers with other dried botanicals like rose petals, lavender, citrus peels, or spices like cinnamon sticks and cloves. Add a few drops of complementary essential oils (e.g., lemon, bergamot, ylang-ylang) to enhance the scent. Place the mixture in decorative bowls.
Sachets: Fill small fabric bags or pouches with the dried Candle Bush material. These can be placed in drawers, closets, or even in your car to impart a subtle, natural fragrance.
Practical Applications in the Garden
Integrating Candle Bush into your gardening routine for product creation is more than just a hobby; it’s a step towards greater self-sufficiency and a deeper appreciation for nature’s bounty.
Natural First-Aid Kit: Keep your homemade Candle Bush salves and infused oils on hand for treating minor cuts, scrapes, fungal infections, or dry, itchy skin. Having these readily available reduces reliance on commercial products, many of which contain synthetic ingredients.
Sustainable Home Goods: Use the natural dyes to refresh old linens, create unique gifts, or even dye yarn for knitting and crochet projects. This is a beautiful way to upcycle and reduce the environmental impact of synthetic dyes.
Aromatic Spaces: Place your homemade sachets in linen closets or drawers to impart a pleasant, natural scent without the use of artificial fragrances.
Educational Opportunities: Involve family members, especially children, in the process of harvesting, drying, and creating. This fosters an understanding of where natural products come from and encourages respect for plants and the environment.
Gifting: Handcrafted herbal products make thoughtful and unique gifts for friends and family, showcasing your gardening skills and your commitment to natural living.
Common Mistakes to Avoid
Even with a robust plant like Candle Bush, there are common pitfalls that can hinder your herbal product creation.
Over-Harvesting: Taking too much of the plant at once can stress it, reduce future yields, and even lead to its demise. Always harvest responsibly.
Improper Drying: Not drying herbs thoroughly before storage is a recipe for mold and mildew, rendering your harvest unusable and potentially unsafe. Ensure they are completely brittle.
Using Fresh Leaves for Oils/Salves: While fresh leaves are great for poultices, they contain water, which can cause your infused oils and salves to spoil quickly. Always use dried material for oil infusions and salves.
Excessive Heat During Infusion: Overheating oils can destroy delicate beneficial compounds and even create a rancid smell. Use gentle, low heat.
Ignoring Patch Tests: Before applying any homemade herbal preparation to a large area of skin, always perform a patch test on a small, inconspicuous area to check for allergic reactions or sensitivity.
Internal Use Without Knowledge: While Candle Bush has traditional uses for internal ailments, it’s crucial to understand dosage and contraindications. Consult with a healthcare professional or a qualified herbalist before ingesting any herbal preparation, especially for laxative effects.
Contaminated Equipment: Ensure all jars, tools, and containers are clean and sterilized to prevent bacterial contamination of your herbal products.
Expert Tips or Pro Insights
Seasoned herbalists and gardeners often have a few tricks up their sleeves for maximizing the benefits of their harvests.
“Stalk Drying” for Flowers: For flowers intended for dyes, some herbalists recommend leaving them on their stems and hanging them upside down to dry. This can sometimes preserve more of the pigment.
Combining with Other Herbs: Enhance the efficacy and aroma of your Candle Bush products by combining it with complementary herbs. For salves targeting fungal issues, consider adding tea tree, oregano, or calendula. For soothing properties, lavender or chamomile are excellent choices.
Micro-Batching for Potency: For maximum potency, especially for medicinal products, consider making smaller batches more frequently rather than large batches that may sit for extended periods.
Learn About Your Plant’s Specifics: While Senna alata is generally uniform, slight variations in chemical composition can occur based on growing conditions, soil type, and climate. Observing how your specific plant responds to different preparations can be insightful.
* Cold-Infusion for Delicate Compounds: For certain preparations where preserving delicate volatile oils is crucial, a cold infusion process (soaking herbs in oil or water in the refrigerator for several days or weeks)

