
Blue Star Juniper Propagation Training Module: Cultivating Your Own Evergreen Stars
Can you truly master the art of propagating Blue Star Juniper, transforming a single plant into a cascade of these beloved, star-shaped evergreens? If you’ve ever admired the silvery-blue foliage and compact, mounding habit of the Blue Star Juniper and dreamed of filling your garden with its unique charm, then this comprehensive training module is your definitive guide. Understanding effective propagation techniques is not just about expanding your plant collection; it’s about cultivating resilience, ensuring genetic diversity, and fostering a deeper connection with the plants you grow. Mastering Blue Star Juniper propagation means unlocking a sustainable and rewarding way to enhance your landscape, share your passion with fellow gardeners, and even save significant costs on new plants.
Quick Answer Box
Yes, you can effectively propagate Blue Star Juniper through cuttings. This method involves taking stem cuttings from a healthy parent plant during the appropriate season, treating them with rooting hormone, and providing them with optimal conditions for root development. Mastering Blue Star Juniper propagation through cuttings is a rewarding process that allows you to clone your favorite specimens and expand your garden sustainably.
What is Blue Star Juniper Propagation Training Module and Why It’s Important in Gardening
A “Blue Star Juniper propagation training module” refers to a structured educational program or resource designed to teach individuals the specific techniques and best practices for successfully propagating Juniperus squamata ‘Blue Star’. This specialized training covers everything from selecting the right parent plants to the final potting of new, rooted plants.
The importance of such a module in gardening lies in several key areas:
Horticultural Skill Development: It equips gardeners with a valuable skill that can be applied to many other woody plants.
Cost Savings: Propagating your own plants significantly reduces the expense of purchasing mature specimens.
Conservation & Biodiversity: It allows for the preservation of desirable genetic traits and helps maintain healthy populations of specific cultivars.
Personal Satisfaction: Successfully propagating a plant provides immense satisfaction and a deeper understanding of plant life cycles.
Sharing & Community: It enables gardeners to share their passion and provide plants for friends, family, or community garden projects.
Quick Recommendations or Key Insights about Blue Star Juniper Propagation Training Module
Best Time for Cuttings: Late spring to early summer (May-June) is generally ideal for taking Juniper cuttings.
Cutting Selection: Choose healthy, semi-hardwood stems from the current season’s growth.
Rooting Hormone: Always use a rooting hormone to significantly increase your success rate.
Propagation Medium: A well-draining mix of perlite, peat moss, or coco coir is crucial.
Humidity is Key: Maintaining high humidity around the cuttings is vital for preventing desiccation.
Patience is a Virtue: Rooting can take several weeks to several months; don’t disturb cuttings prematurely.
Sterilization: Always use clean tools and containers to prevent disease.
Detailed Breakdown of Blue Star Juniper Propagation Training Module
Understanding Blue Star Juniper (Juniperus squamata ‘Blue Star’)
Before diving into propagation, it’s essential to understand the plant itself. Blue Star Juniper is a dwarf, evergreen conifer prized for its dense, radially arranged foliage that resembles a starburst, giving it its distinctive name. Its striking silvery-blue color provides year-round interest and a unique textural element to garden landscapes. It’s a slow-growing shrub, typically reaching only 2-3 feet in height and 3-5 feet in width, making it ideal for rock gardens, containers, and smaller garden spaces.
Scientific Perspective: Blue Star Juniper is a cultivar of Juniperus squamata, a species native to the Himalayas. Its compact, mounding habit and distinctive foliage are the result of selective breeding and horticultural selection. Like most conifers, it reproduces sexually through cones, but vegetative propagation (like cuttings) allows for the reliable replication of its specific desirable traits.
Practical Applications: The slow growth and compact nature of Blue Star Juniper make it a popular choice for foundation plantings, borders, and accent plants. Its ability to thrive in well-drained soil and full sun makes it relatively adaptable, though it prefers cooler climates and can be susceptible to root rot in poorly drained conditions.
Common Myths:
Myth: Blue Star Juniper is difficult to propagate.
Reality: While it requires specific conditions, it is a reliably propagable plant with the right techniques and patience.
Myth: You can grow Blue Star Juniper from seed.
Reality: While possible, seeds from cultivars often don’t come true to type, meaning they won’t possess the exact desirable ‘Blue Star’ characteristics. Cuttings are the preferred method for cultivar propagation.
The Art of Taking Blue Star Juniper Cuttings
Successfully propagating Blue Star Juniper begins with the careful selection and preparation of cuttings. This process is more art than guesswork when you understand the plant’s physiology.
Step-by-Step Gardening Instructions:
1. Timing is Crucial: The optimal time to take cuttings from Blue Star Juniper is during its active growth phase, typically from late spring to early summer (May through June). This is when the new growth, known as semi-hardwood, is starting to mature but is still flexible. You can also take cuttings in the fall (September-October) from slightly older wood, but spring cuttings often have a higher success rate due to warmer temperatures and increased daylight.
2. Select Healthy Parent Plants: Choose a vigorous, disease-free Blue Star Juniper as your source. Look for stems that are healthy, show good color, and are free from any signs of pests or diseases. The parent plant’s health directly influences the success of your cuttings.
3. Identify the Right Stems: Look for stems that are about 4-6 inches long. The ideal stem will have a mixture of current season’s growth (which is softer) and slightly older, more mature wood. This is termed semi-hardwood. You want to avoid extremely soft, leafy new growth or old, woody stems.
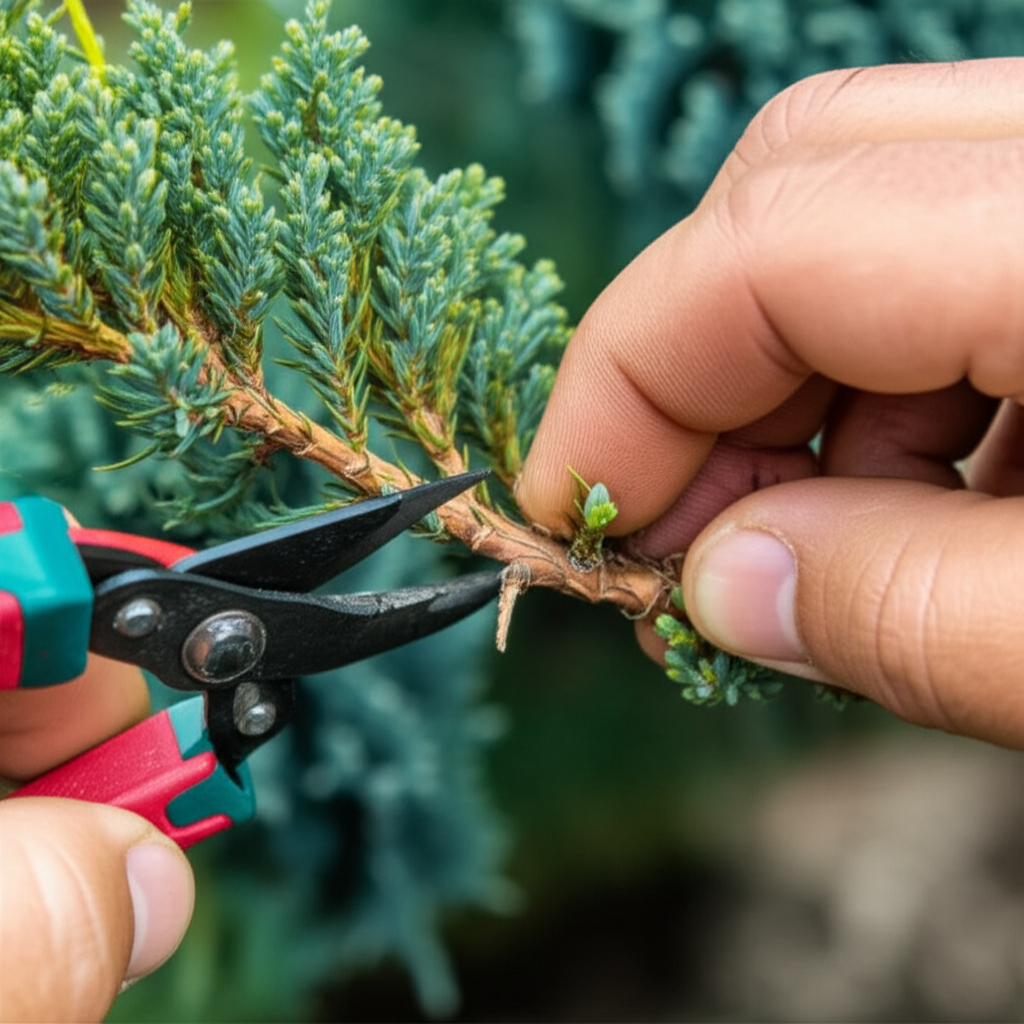
4. Make the Cut: Using sharp, sterilized pruning shears or a sharp knife, make a clean cut just below a leaf node (the point where a leaf attaches to the stem). A clean cut is essential to prevent disease entry and promote healing. Sterilize your tools with rubbing alcohol or a bleach solution (1 part bleach to 9 parts water) before and between cuts to prevent the spread of pathogens.
5. Prepare the Cutting:
Remove Lower Foliage: Gently strip off the leaves from the bottom 2-3 inches of the cutting. This exposes the nodes where roots will emerge and prevents the leaves from being submerged in the soil, which can lead to rot.
Optional: Leaf Trim: For cuttings with very dense foliage, you can lightly trim the remaining leaves by about half. This reduces water loss through transpiration while still allowing enough foliage for photosynthesis.
Optional: Wound the Stem: Some propagators lightly scrape a small sliver of bark (about 1/2 inch long) from one side of the bottom of the stem. This exposes the cambium layer, which can encourage faster rooting. Be gentle; you don’t want to remove too much bark.
Techniques for Success:
Rooting Hormone: This is perhaps the most critical step for Juniper propagation. Dip the cut end of the prepared cutting into a commercial rooting hormone powder or liquid. Ensure the bottom 1-2 inches of the stem are coated. Tap off any excess. Rooting hormones contain auxins, which stimulate root development.
Propagation Medium: The potting mix must be well-draining to prevent the cuttings from rotting before they can root. A good mix can be made from equal parts perlite and peat moss, or perlite and coco coir. You can also use a commercial seed starting or propagation mix. Avoid heavy, dense soils.
Containers: Use small pots, seedling trays with deep cells, or even a flat with a good drainage system. Ensure the containers are clean.
Real-Life Examples:
A gardener in Oregon takes 4-inch semi-hardwood cuttings from their established Blue Star Juniper in early June. After removing the lower foliage and dipping the ends in rooting hormone, they insert them into a mixture of perlite and peat moss in a seed tray. They then cover the tray with a clear plastic dome to maintain humidity.
Another gardener in a warmer climate finds success by taking cuttings in early September. They use 40-cell propagation trays filled with a coco coir and perlite mix. After inserting the cuttings, they place the trays in a shaded, protected area outdoors, misting them daily.
Practical Applications in the Garden
The knowledge gained from a Blue Star Juniper propagation training module can be directly applied to enhance your gardening practices:
Expanding Your Landscape: Propagate enough Blue Star Junipers to fill in gaps in existing beds, create a border, or establish a new rock garden feature.
Container Gardening: Grow several Blue Star Junipers in attractive pots for patios, balconies, or entryways.
Gifts for Fellow Gardeners: Share your success by gifting rooted Blue Star Junipers to friends and family. It’s a thoughtful and sustainable present.
Cost-Effective Landscaping: Instead of buying multiple mature plants, propagate a few to start and gradually increase your stock over time.
Plant Swaps and Community Projects: Contribute to local garden clubs or community planting initiatives by providing home-grown Blue Star Junipers.
Common Mistakes to Avoid
Using the Wrong Stems: Taking cuttings that are too soft (new growth) or too old and woody will significantly reduce rooting success.
Not Sterilizing Tools: This is a major cause of fungal infections and rot, killing your cuttings.
Over-watering the Propagation Medium: While humidity is important, a waterlogged medium suffocates roots and promotes rot. The medium should be moist but not saturated.
Forgetting Rooting Hormone: While some plants might root without it, Junipers greatly benefit from it, making it a crucial step.
Not Providing Adequate Humidity: Conifer cuttings are prone to drying out quickly. Insufficient humidity is a primary reason for failure.
Disturbing Cuttings Too Soon: Be patient! Resist the urge to pull on the cuttings to check for roots. Wait until they show new growth, indicating root establishment.
Using Poorly Draining Soil: Heavy soil will lead to root rot. Always use a light, airy, and well-draining propagation mix.
Placing Cuttings in Direct Sunlight: While they need bright, indirect light, direct sun can scorch and desiccate the cuttings.
Expert Tips or Pro Insights
Bottom Heat: For faster and more consistent rooting, especially in cooler conditions, place your propagation trays on a seedling heat mat. This provides gentle warmth to the base of the cuttings, stimulating root development.
“Heeling” Cuttings: When taking cuttings, you can sometimes inadvertently pull a small sliver of bark from the parent stem. Some propagators deliberately make a small “heel” of the parent stem attached to the cutting by making a cut at an angle that includes a small piece of the older stem. This can sometimes enhance rooting.
Aftercare for Rooted Cuttings: Once cuttings have developed a strong root system (you’ll see new top growth and feel resistance when gently tugging), they need to be gradually acclimated to less humid conditions. Gradually lift the lid of your humidity dome or vent the propagation area.
Potting Up: When ready to pot up, use a slightly richer, but still well-draining, potting mix. Water thoroughly and place the newly potted plants in a shaded, protected location for a few weeks before moving them into brighter light.
Overwintering: Young cuttings are more vulnerable to cold. In colder climates, overwinter them in a cold frame, unheated greenhouse, or indoors in a bright location, protecting them from hard freezes.
Seasonal or Climate Considerations (if applicable)
Spring Propagation (Late Spring/Early Summer): This is generally the most reliable time. The increasing temperatures and longer days provide optimal conditions for root formation. Cuttings taken now will establish well before winter.
Fall Propagation (Late Summer/Early Fall): While possible, success rates can be lower, especially in regions with harsh winters. Cuttings taken in fall may not root sufficiently before the onset of cold weather, requiring more careful overwintering. However, in milder climates, fall propagation can be very successful.
Climate Impact:
Hot Climates: In very hot regions, you’ll need to provide more shade for your cuttings and ensure they don’t dry out. Misting frequently or using a propagation tent can be beneficial.
Cold Climates: Focus on taking cuttings when the plant is actively growing and ensure young, rooted plants are protected from harsh winter conditions. Overwintering in a protected environment is essential.
Humid Climates: Be extra vigilant about air circulation to prevent fungal diseases, even while maintaining humidity for the cuttings.
Buying Guide or Decision-Making Process (if applicable)
While this module focuses on propagation, understanding what to look for in a parent plant is crucial:
Source: Purchase from a reputable nursery or garden center. Look for healthy plants with good overall form.
Foliage Color: Ensure the silvery-blue color is vibrant and consistent, as this is the primary characteristic you’ll be propagating.
Growth Habit: Observe the plant’s natural mounding and radial growth. You want to select cuttings from plants that exhibit this desirable form.
Disease Resistance: Look for plants that appear free from any signs of pests or diseases.
When purchasing rooting hormones or propagation media, consider:
Rooting Hormone: Available in powder, liquid, or gel form. Powders are generally easier for beginners. Choose one formulated for woody plants or conifers.
Propagation Media: Look for sterile, well-draining mixes. Perlite, vermiculite, peat moss, and coco coir are common components. Avoid standard potting soil, which is too dense.
FAQ Section for Blue Star Juniper Propagation Training Module
Q1: How long does it take for Blue Star Juniper cuttings to root?
A: It typically takes anywhere from 4 to 8 weeks for cuttings to develop a substantial root system. However, some can take longer, up to 3-4 months, especially if conditions are not ideal. Patience is key.
Q2: What is the best way to check if my cuttings have rooted?
A: The most reliable way is to gently tug on the cutting. If you feel resistance, it indicates roots have formed. You can also look for new top growth, which is a strong sign of successful rooting. Avoid pulling them out of the medium frequently, as this can damage delicate new roots.
Q3: Can I propagate Blue Star Juniper from leaf cuttings?
A: No, Blue Star Juniper is a conifer and does not propagate from leaf cuttings. It is propagated vegetatively through stem cuttings.
Q4: My cuttings are turning yellow or brown. What’s wrong?
A: This is usually a sign of dehydration (low humidity), over-watering leading to rot, or insufficient light. Ensure consistent moisture in the medium, high humidity around the cuttings, and bright, indirect light.
Q5: Should I leave the cuttings in the original propagation tray or pot them up immediately after rooting?
A: It’s best to let the roots develop sufficiently in the propagation tray before potting them up into individual pots. Once they have a good root ball, carefully transplant them into a well-draining potting mix.
Q6: Can I propagate Blue Star Juniper indoors year-round?
A: While you can start propagation indoors, the ideal conditions (consistent warmth, humidity, and light) are often best achieved during the natural growing season. If attempting year-round propagation indoors, you will likely need supplemental grow lights and a carefully controlled environment.
Q7: What is the difference between softwood, semi-hardwood, and hardwood cuttings?
A: Softwood cuttings are taken from very new, flexible growth in spring. Semi-hardwood cuttings are taken from the current season’s growth that has begun to mature and harden off (late spring to summer). Hardwood cuttings are taken from dormant, mature wood in late fall or winter. Blue Star Juniper is best propagated from semi-hardwood cuttings.
Conclusion for Blue Star Juniper Propagation Training Module
Mastering the Blue Star Juniper propagation training module empowers you to effortlessly cultivate these stunning evergreen stars, transforming your gardening efforts into a source of abundance and beauty. By understanding the nuances of stem selection, proper preparation, the vital role of rooting hormone, and the necessity of consistent humidity and well-draining media, you are well-equipped to clone your favorite Blue Star Junipers with confidence. This knowledge not only saves you money but also deepens your horticultural expertise, allowing you to share these unique plants and enrich your garden and the gardens of others. Embrace these techniques, be patient with the process, and soon you’ll be enjoying a delightful abundance of silvery-blue foliage, a testament to your successful propagation skills.

