
Here’s a comprehensive blog post for the keyword “basil plant cuttings,” structured as requested and designed to be SEO-optimized, informative, and engaging for all levels of gardeners.
Basil Plant Cuttings: Effortless Growth for an Abundant Herb Garden
Have you ever gazed at a lush, bushy basil plant, overflowing with aromatic leaves, and wondered if there was a way to replicate that bounty without starting from seed every time? Perhaps you’ve admired a friend’s thriving basil or dreamed of having a continuous supply of fresh pesto ingredients right at your fingertips. The secret to unlocking this abundance, and a cornerstone of efficient herb gardening, lies in mastering the art of basil plant cuttings. This simple yet incredibly effective propagation method allows you to easily multiply your basil plants, ensuring a steady harvest and a more sustainable, rewarding gardening experience. Understanding how to take and root basil cuttings is not just about getting more basil; it’s about extending your growing season, rescuing leggy plants, and sharing the joy of homegrown herbs with others.
Quick Answer Box
Yes, propagating basil plant cuttings is an incredibly effective and straightforward method to grow new, healthy basil plants. By taking cuttings from a mature basil plant, you can easily root them in water or soil, creating clones of the parent plant for a continuous harvest and an expanded herb garden. This technique is ideal for beginners and seasoned gardeners alike, offering a fast track to delicious, homegrown basil.
What are Basil Plant Cuttings and Why They’re Important in Gardening
Basil plant cuttings refer to a small section of stem and leaves taken from a healthy, mature basil plant, which is then induced to grow its own roots, effectively creating a new, independent plant. This process is a form of vegetative propagation, meaning the new plant is genetically identical to the parent plant, ensuring it will have the same desirable traits, such as flavor, aroma, and growth habit.
The importance of understanding basil plant cuttings in gardening is multifaceted:
Rapid Multiplication: It’s a much faster way to obtain new basil plants compared to starting from seed, especially if you want multiple plants quickly.
Plant Rescue and Revitalization: Leggy or overgrown basil plants can be rejuvenated by taking cuttings, which encourages the mother plant to bush out and produce more foliage.
Cost-Effective: You can essentially get free plants from an existing one, saving money on purchasing new seedlings or seeds.
Preserving Desired Varieties: If you have a specific basil variety with exceptional flavor or growth characteristics, cuttings ensure you can replicate it exactly.
Extending the Harvest: By taking cuttings throughout the season, you can replace older plants or start new ones to ensure a continuous supply of basil well into the cooler months (indoors).
Sharing the Bounty: It’s a wonderful way to share your gardening success and provide friends and family with their own healthy basil plants.
Quick Recommendations or Key Insights about Basil Plant Cuttings
Timing is Key: Take cuttings in the morning after the dew has dried for best results.
Healthy Parent Plant: Always select cuttings from a vigorous, disease-free basil plant.
The Right Cutting: Aim for stems that are 4-6 inches long with healthy leaves.
Remove Lower Leaves: Strip the leaves from the bottom 2-3 inches of the stem to prevent rotting in water or soil.
Water Propagation: Rooting in water is often the easiest and most visually satisfying method for beginners.
Soil Propagation: For a more robust root system from the start, direct soil propagation can be effective.
Pinch Back Regularly: Once rooted, pinching the tops of your new basil plants will encourage bushier growth.
Detailed Breakdown of Basil Plant Cuttings
The Science Behind Rooting Basil Cuttings
From a botanical perspective, basil plant cuttings leverage the plant’s natural ability to regenerate. Stems contain nodes, which are points where leaves emerge. These nodes are rich in meristematic tissue, a type of plant cell that is undifferentiated and capable of rapid cell division. When a stem is cut and placed in a suitable environment (like water or moist soil), these meristematic cells at the nodes can differentiate and develop into new root cells, forming adventitious roots – roots that grow from a plant part other than the primary root. Hormones present in the stem, particularly auxins, play a crucial role in stimulating root development. The presence of adequate moisture, light, and warmth triggers these cells to initiate the rooting process.
Practical Applications in the Garden: From Cutting to Container
The beauty of propagating basil plant cuttings lies in its versatility. You can seamlessly integrate this practice into your daily gardening routine:
1. Harvesting for Cuttings: When your basil plant becomes leggy, or you simply want more plants, select a healthy stem. Cut just above a set of leaves using clean scissors or pruning shears. Aim for a stem that is at least 4-6 inches long.
2. Preparing the Cutting: Gently remove the leaves from the bottom 2-3 inches of the stem. This exposes the nodes where roots will form and prevents leaves from sitting in water and decaying. Leave 2-4 sets of leaves at the top.
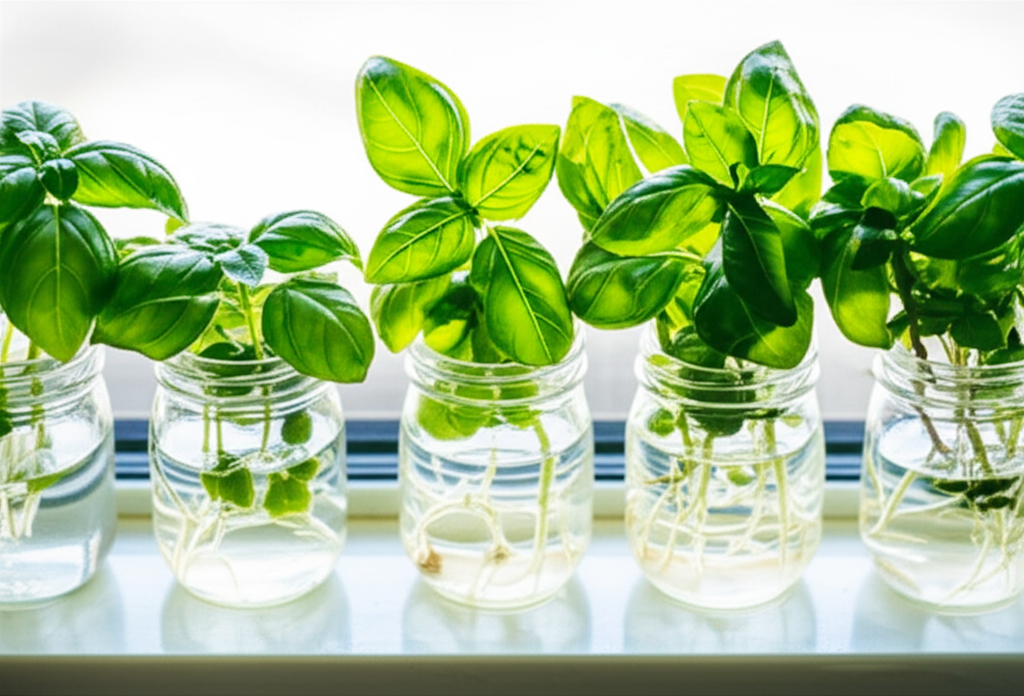
3. Water Propagation:
Place the prepared cutting in a clean glass or jar filled with fresh water.
Ensure the nodes where you removed the leaves are submerged, but the top leaves are above the waterline.
Place the jar in a bright spot, but out of direct, intense sunlight, which can scorch the leaves or heat the water too much.
Change the water every 2-3 days to keep it fresh and oxygenated, preventing bacterial growth.
Within 1-3 weeks, you should start to see small white roots emerging from the nodes.
4. Soil Propagation:
Once your cutting has developed a good root system in water (at least an inch long), or if you prefer to skip the water stage, you can plant it directly into soil.
Fill a small pot with a well-draining potting mix. A mix designed for seedlings or herbs works well.
Make a small hole in the soil with your finger or a pencil.
Gently insert the cutting into the hole, ensuring the nodes are buried.
Firm the soil around the stem.
Water thoroughly.
You can cover the pot with a clear plastic bag or a propagator lid to create a humid environment, which aids rooting. Ensure there are a few air holes or lift the bag daily to prevent mold.
Keep the soil consistently moist but not waterlogged.
Roots will typically form within 2-4 weeks, and you can test by gently tugging on the cutting – if there’s resistance, roots have formed.
5. Transplanting Rooted Cuttings:
Once your cuttings have a robust root system (either in water or soil), they are ready to be transplanted into their own pots or directly into the garden if the weather is warm and all danger of frost has passed.
If transplanting from water to soil, allow the roots to acclimate gradually by placing the water jar in a cooler location for a day or two before planting.
When planting in the garden, choose a sunny spot with well-draining soil. Space plants about 10-12 inches apart.
Common Mistakes to Avoid
Using Diseased or Weak Plants: Cuttings from unhealthy plants are less likely to root and may pass on diseases.
Overcrowding Cuttings: Both in water and soil, give your cuttings enough space to breathe and develop roots without competition.
Using Dirty Water or Tools: Contamination can lead to fungal or bacterial infections, killing the cuttings. Always use clean containers and sanitize your cutting tools.
Too Much Sun Too Soon: Young cuttings are sensitive. Direct, harsh sunlight can dry them out quickly or damage the leaves before roots are established.
Waterlogged Soil: While cuttings need moisture, constantly soggy soil can cause the stem to rot before roots can form. Ensure good drainage.
Forgetting to Change Water: Stagnant water can harbor bacteria and reduce oxygen levels, hindering root development.
Planting Too Deeply: Burying the leaves in soil or water can lead to rot. Ensure only the nodes intended for rooting are submerged.
Expert Tips or Pro Insights
Rooting Hormone: For a higher success rate, especially with more challenging plants (though basil is quite forgiving), dipping the cut end of the stem into rooting hormone powder before placing it in water or soil can significantly speed up and improve root formation.
The “Mother Plant” Pinch: When you take cuttings from the top of your basil, you’re essentially “pinching back” the plant. This encourages the plant to branch out from the leaf nodes below the cut, leading to a bushier, more productive plant. Think of it as a haircut that promotes growth!
Succession Planting: To ensure a continuous harvest, take cuttings every few weeks throughout the growing season. This way, you’ll always have young, vigorous plants ready to replace older ones.
Indoor Overwintering: In cooler climates, you can take cuttings in late summer or early fall and root them indoors to keep basil going through the winter months. This is an excellent way to have fresh basil even when your outdoor garden is dormant.
Experiment with Basil Varieties: Different basil varieties might have slightly varying rooting times or preferences. Experimenting with sweet basil, Thai basil, lemon basil, or purple basil can be a fun way to discover new flavors and observe their propagation responses.
Seasonal or Climate Considerations
Spring and Summer: These are the prime seasons for propagating basil plant cuttings. Warm temperatures and increasing sunlight provide ideal conditions for rapid root development. You can easily root cuttings outdoors in pots or directly in the ground once the soil has warmed up and all danger of frost has passed. The long daylight hours also promote vigorous growth once the new plants are established.
Autumn: As temperatures begin to cool, basil growth slows down. While you can still take cuttings, rooting may take longer. This is also the best time to take cuttings if you want to bring basil indoors to overwinter. Rooting them in late summer or early fall allows them to establish before the shorter days and cooler indoor temperatures become a factor.
Winter: Indoor propagation is possible during winter, but it requires careful attention to light and temperature. Place cuttings in a bright, south-facing window or supplement with a grow light. Ensure the room is warm, as basil is sensitive to cold.
Climate Zones: In warmer climates with extended growing seasons, you can propagate basil almost year-round. In colder climates, propagation is best done during the warmer months, with a focus on bringing rooted cuttings indoors for overwintering if you wish to continue harvesting. Always consider the last frost date for your specific zone when transplanting rooted cuttings outdoors.
FAQ Section for Basil Plant Cuttings
Q1: How long does it take for basil cuttings to root?
A1: Basil cuttings typically start forming roots in water within 1-3 weeks. In soil, it might take 2-4 weeks, depending on the conditions.
Q2: Can I plant basil cuttings directly into the garden without rooting them in water first?
A2: Yes, you absolutely can. Prepare the cutting by removing the lower leaves, and then plant it directly into moist, well-draining soil. Keeping the soil consistently moist and providing some humidity (e.g., with a cloche or plastic bag) will help it root.
Q3: My basil cuttings are rotting in water. What am I doing wrong?
A3: Rotting usually occurs due to stagnant water, lack of oxygen, or bacterial contamination. Ensure you change the water every 2-3 days, use clean jars, and remove any leaves that might be submerged. Don’t overcrowd the jar, and avoid using very hot water.
Q4: What kind of water should I use for rooting basil cuttings?
A4: Room temperature tap water is usually fine. If your tap water is heavily chlorinated, letting it sit out for 24 hours before use can help dissipate some of the chlorine. Distilled or filtered water also works well.
Q5: Can I use rooting hormone on basil cuttings?
A5: While basil is easy to root without it, using a rooting hormone can certainly speed up the process and increase the success rate, especially if the cutting is a bit older or you’re propagating in less-than-ideal conditions.
Q6: When is the best time to take basil cuttings?
A6: The best time is during the plant’s active growing season – typically spring and summer. Morning is often ideal, after the dew has evaporated, when the plant is well-hydrated.
Q7: My rooted basil cuttings look a bit weak. What can I do?
A7: Once rooted, ensure they are planted in good quality, well-draining potting mix. Provide adequate sunlight (bright, indirect light initially, gradually moving to more direct sun) and consistent moisture. Pinching the tips will encourage bushier growth, making the plant appear stronger.
Conclusion for Basil Plant Cuttings
Mastering the art of basil plant cuttings is a gateway to an effortlessly abundant herb garden. This simple propagation technique not only allows you to multiply your basil plants with ease but also rejuvenates existing ones, saves you money, and ensures a continuous supply of this beloved culinary herb. By understanding the science behind rooting, following practical steps for water or soil propagation, avoiding common pitfalls, and incorporating expert insights, you can confidently transform a single basil plant into a thriving patch. Whether you’re a beginner looking for an easy win or a seasoned gardener seeking to expand your collection, propagating basil cuttings offers a rewarding and sustainable path to fresh, homegrown flavor. Start snipping, start rooting, and enjoy the continuous bounty your basil plants have to offer.

